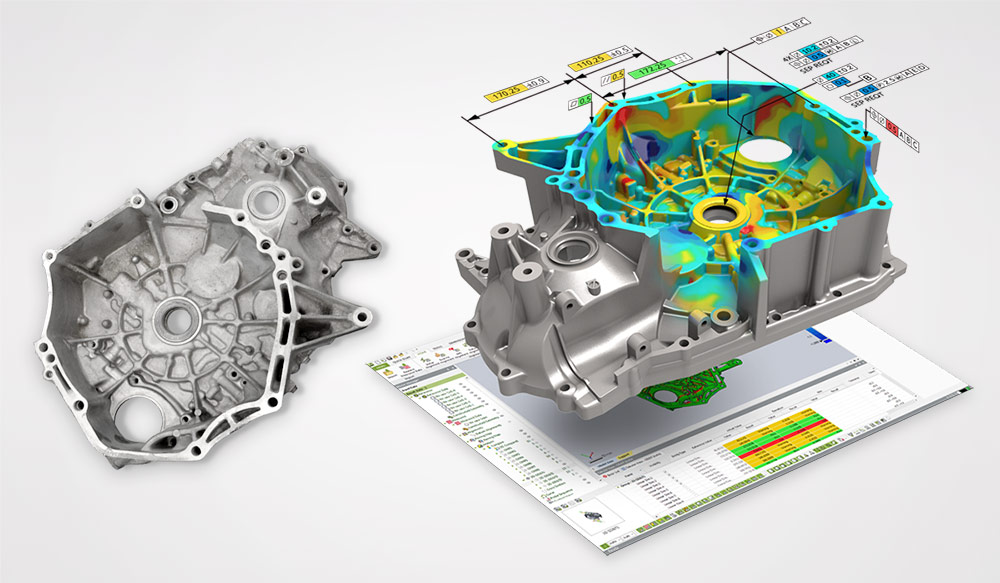
Looking for ways to improve quality at every step of your design and manufacturing processes? Geomagic Control X pinpoints the source of the issues quickly to help you manufacture better products.
The latest version of Geomagic Control X 2020 is here! The vision of this new version is to ensure quality everywhere. Measure more parts, more often, and in more places. New features and enhancements are there to help you ensure quality control across the entire organization, regardless of where your team or stakeholders are located—in the office, remotely, or anywhere in the world.
What is Geomagic Control X?
Geomagic Control X is the ultimate 3D inspection software for manufacturing that works with any 3D scanner or portable CMM. It’s a comprehensive solution that helps you make sense of complex measurement problems in an easy to understand format with color maps and reports.
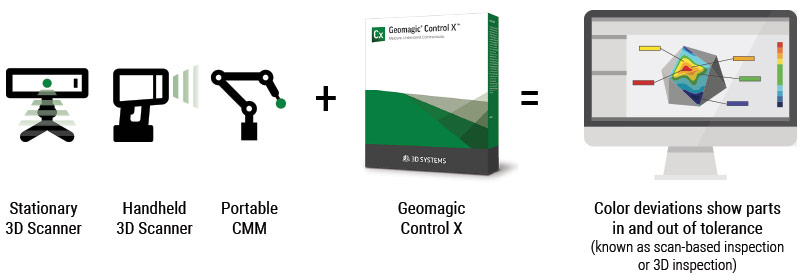
The 3D metrology software compares 3D scanner data (which contains surface measurement data) of a manufactured part (a prototype, first-article, or finished goods) to a golden standard (a CAD model), to see if the part is manufactured according to specifications. If the part falls out of specified tolerance, Control X gives a complete picture as to exactly where the parts pass or fail. You have access to all the information to find the source of the issue and fix it immediately.
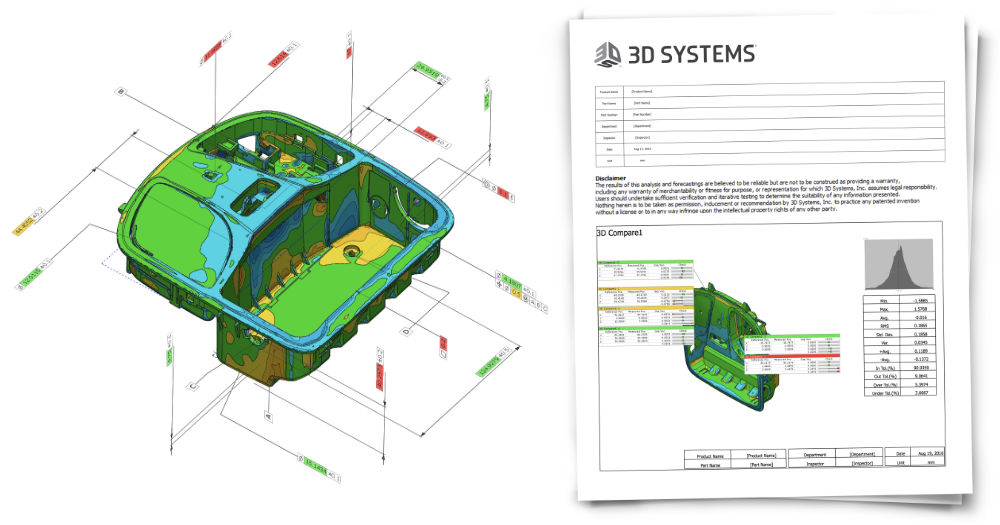
Control X provides scan to CAD measurement information with color deviation maps and GD&T. The scan-based inspection software is known for its comprehensive reports with 3D PDF. Everyone can view them on their PC, Mac, or phone–no special software required.
Geomagic Control X is also useful for wear and tear analysis. It pinpoints exactly where machined components need attention for maintenance by repairing or replacing them. As a result, it allows for fast resolution and downtimes in production are minimized.
Now that we’ve looked at the benefits to having this 3D inspection software, let’s dive into what Geomagic Control X 2020 has to offer.
Geomagic Control X New Features and Enhancements
The new version of Control X boosts productivity, reliability, and traceability throughout the inspection process for your entire operation.
What’s New Geomagic Control X 2020 Feature Highlights:
Here’s a quick video overview of the new features and enhancements for Control X 2020:
Geomagic Control X 2020 Release Webinar:
If you have time and want to go more in-depth into Control X 2020, Gregory George (3D Systems Application Engineer Manager, Americas) does an excellent job explaining the features and demos them in his webinar.
Noteworthy Geomagic Control X Features:
There are many features and enhancements to this major release. Here, we’ll focus on some highlights to the Control X 3D inspection software featured in the webinar.
-
Free Inspection Viewer
Fitting in line with the vision of Control X 2020, the latest version includes a free inspection viewer tool. This feature empowers anyone to freely share knowledge throughout your organization. While not everyone in your organization needs the full functionalities of Control X, it is a nice to be able to modify how reports are presented once you have all the source data from your colleague or staff. Improve communication across your organization that leads to better decision making.
You can open full CXProj files and control the visibility of the data and how you want the information to be presented. All you have to do is installed as part of Control X, and it does not need a paid license to be launched.
The free inspection viewer gives you the ability to:
- edit display properties such as annotations and color bars
- create your own reports from the data in the project file
-
New Portable CMM Probing Workflows
The new version of Control X has 20 new geometry probing methods that can easily adapt to challenging feature construction inspection requirements.
For example, it’s now easier to change construction methods on the fly while you are in the Live Inspect tool with different types of probing options.
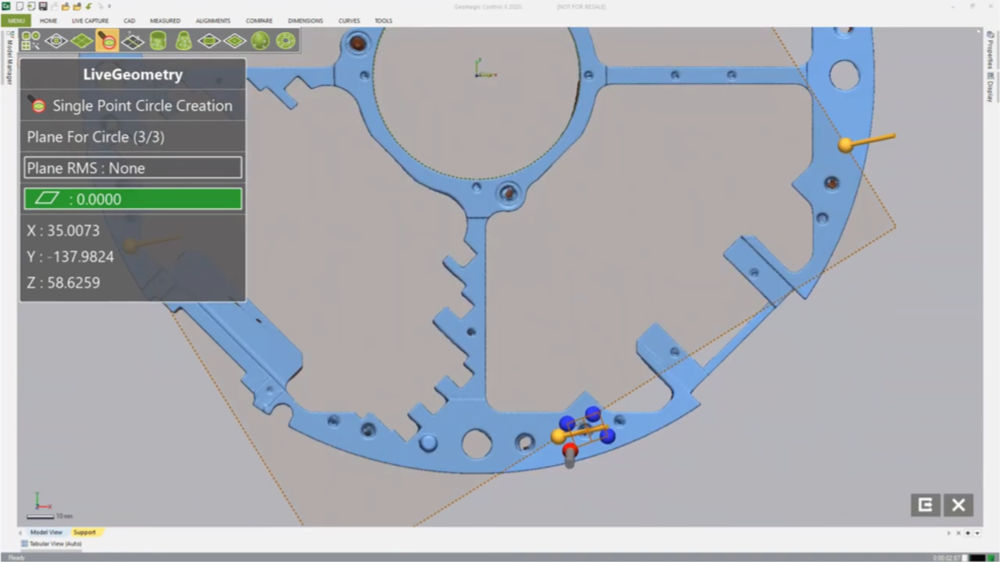
Single Point Circle Creation tool: Sometimes the the circle you are probing is larger than your probe tip. The single point circle creation tool allows you to probe the circle if you select 4 points. It will find the intersection to create the circle. This makes it really fast to probe circles or holes.
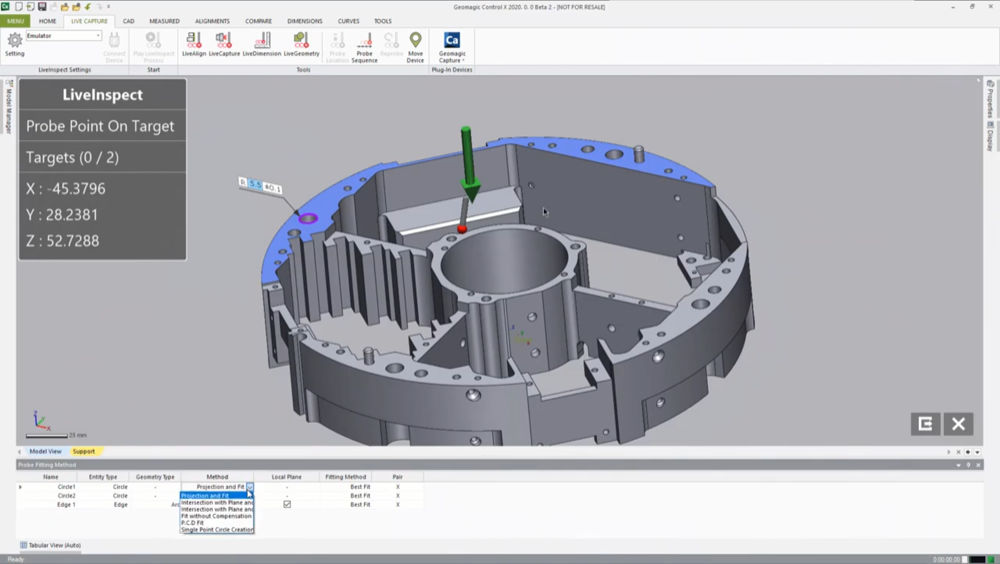
Control X 2020 also makes it easier to call out the probing method on a preplanned inspection with this new table for fast selection to speed up the process.
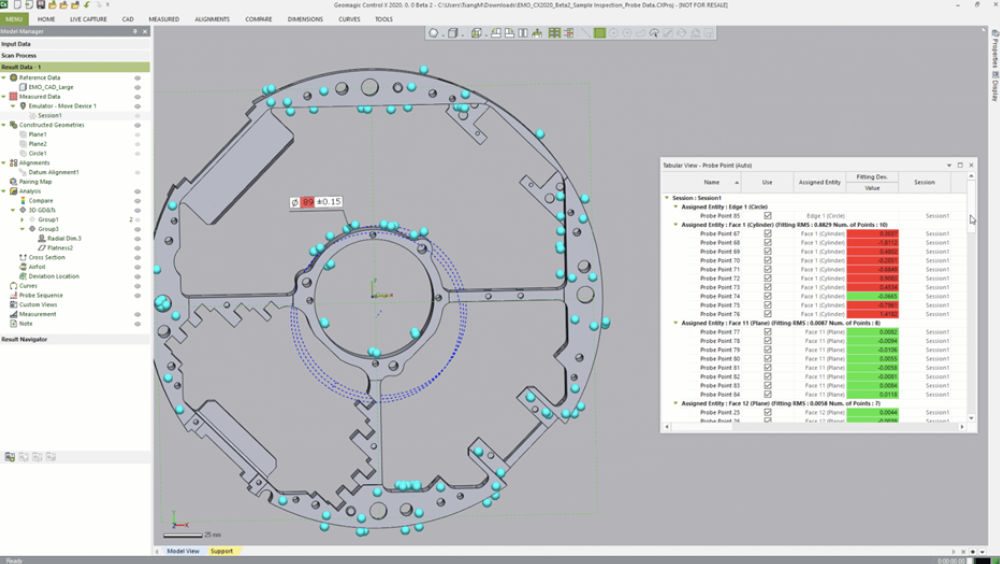
You can now easily manage probe points with the reconfigured tabular view. You can easily identify probe points at a glance that may be contributing error for downstream analysis. Take out any outlier probe data and see the updated results instantly.
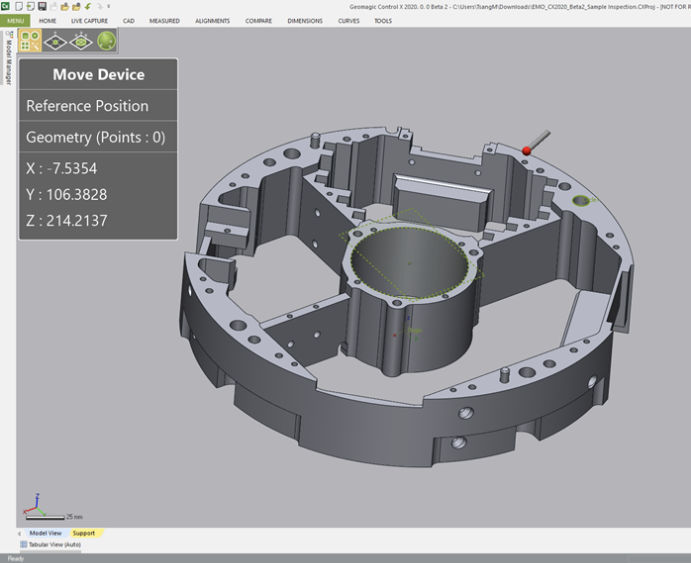
The revamped Move Device interface allows you to easily inspect large parts when moving your portable CMM to include a larger volume of the part. You now have the flexibility and traceability when it comes to repositioning the scanning equipment.
-
Deviation Location
Used primarily for aerospace and automotive surface analysis applications, the Deviation Location feature quickly and easily identifies, measures, and reports surface defects (ie. dents, corrosions, and other types of wear). Deviations are extracted from a surface normal and you have the ability to annotate different characteristics of them. It’s a very specialized tool that’s useful for finding where a surface is pitting or rusting (where and how deep) for defects of aerospace and automotive paneling, gas and oil pipelines, and other surface critical applications that require more precision.
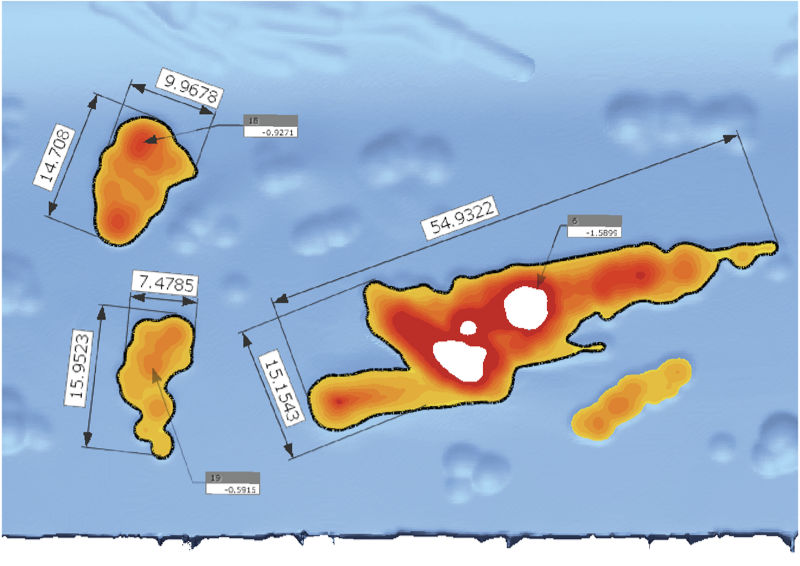
The enhanced feature now provides additional dimensioning options that measure the Major Length and Minor Width of a surface defect, relative to the defect shape, that provides a more precise size of the defect shape.
Another Great Feature to Geomagic Control X:
Comprehensive GD&T Callouts
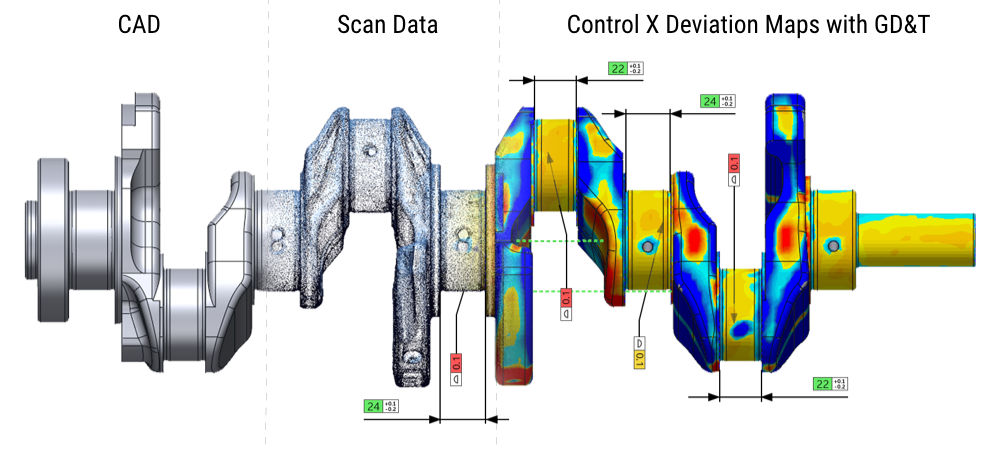
Control X inspecting Scan to CAD measurement information with color deviation maps that indicate where the part is in or out of tolerance alongside GD&T.
Geometric Dimensioning & Tolerancing (GD&T) plays an essential role to accurately measure parts because other forms of measurements can create Tolerance Stackup (When the effects of individual tolerances of each component add up to the final product). Some features can also be difficult to inspect by traditional measurement standards. GD&T provides a universal language for designers, operators, and people inspecting the manufactured parts to understand the design intent clearly so they all know how the part should really look like.
What’s great about Control X is that it includes extensive GD&T tools to analyze size, form, orientation, and location of features according to the ASME Y14.5M standard to make sure parts that pass inspection truly meet the design intent (and also in the meantime not rejecting good parts).
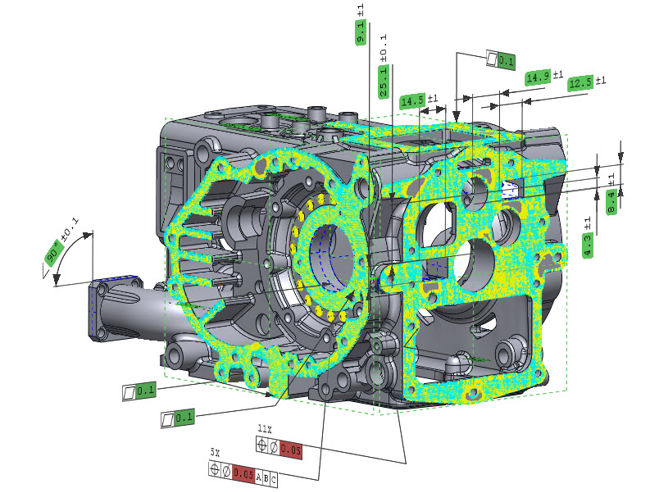
Geomagic Control X measures:
- Linear, angular, radial, elliptical, bore depth, counterbore, countersink, and thickness
- Straightness, flatness, circularity, cylindricity, parallelism, perpendicularity, angularity, position, concentricity, symmetry, line profile, surface profile, runout, and total runout
Dental Application for Geomagic Control X
Geomagic Control X is known for its use mainly in the manufacturing and aerospace. However, dental students MUSC Dental School in Charleston, SC. found innovative ways to use this inspection software for medical applications. They created a step-by-step video on how to use Control X for dental research.
The video goes into depth on the tips and tricks of comparing scan data of dental models including:
- cleaning up the master model (reference data)
- importing measured data
- how to take linear measurements
- 3D compare to show deviation from scan data from the master model
- creating reports
This really highlights what Geomagic Control X excels at doing and its versatility. The 3D metrology software can easily compare a digitized version of a physical object and compare that against a standard.
Want to understand how Geomagic Control X can benefit specifically for your organization?
80%
lower inspection cost
reported by Control X customers based on time and labor-saving
Get a free consultation to better understand how 3D inspection can help lower your inspection cost.
Source: Information and screenshots taken from What’s New in Geomagic Control X Webinar by Gregory George, 3D Systems Application Engineer Manager, Americas. Check out Gregory’s YouTube channel for more great demos on Geomagic software including Geomagic For SOLIDWORKS and Geomagic Design X.
Discover Control X 2020 →